MTCRE : ROUTING POLICY + MARK ROUTING
Pada lab kali ini, kita akan mengonfigurasi routing policy. Konsep routing policy ini adalah untuk memetakan link atau jalur yang akan dilalui oleh client dalam mengakses internet ke jaringan tertentu. Dengan memahami dan menerapkan routing policy dengan baik, kita dapat memastikan bahwa data atau informasi yang dikirimkan oleh client dapat sampai ke tujuan dengan jalur yang paling efisien dan aman.
Prerouting : Bagaimana si router memproses koneksi yang masuk sebelum dikeluarkan.
Output : Paket yang bersumber dari router
TOPOLOGY
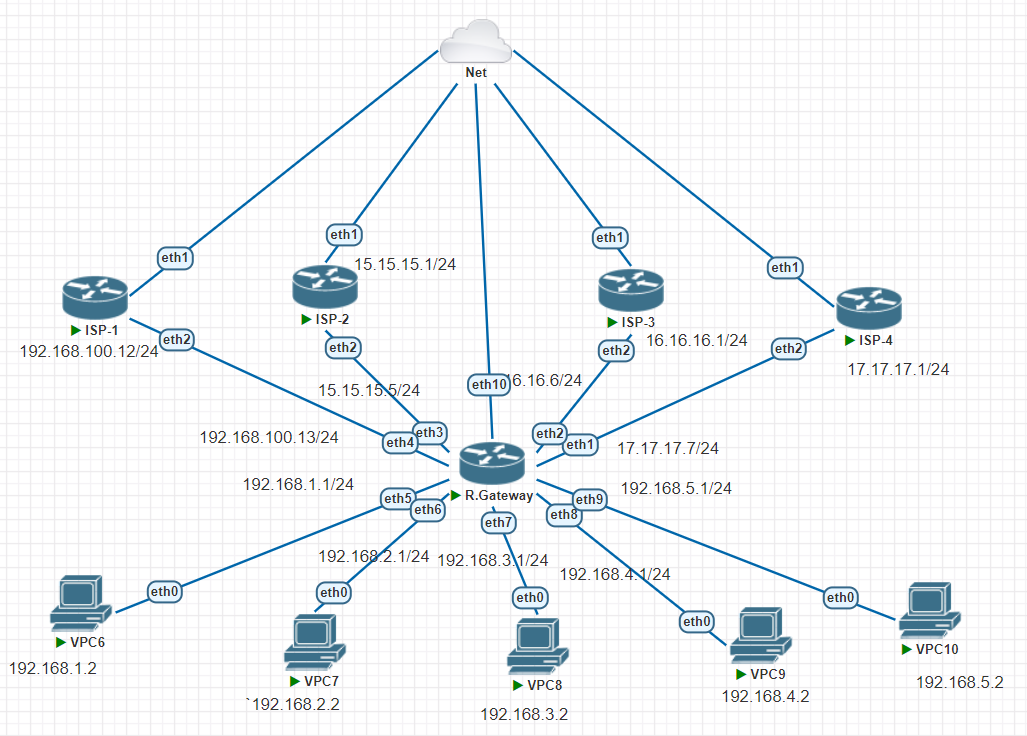
Pada topology diatas saya akan mensimulasikan 4 router ISP, 1 router gateway, serta 5 PC client.
- VPC 6,7 : internet lewat jalur ISP-1
- VPC 8,9 : internet lewat jalur ISP-2
- VPC 10 : internet lewat jalur ISP-3
- Semua packet ICMP bisa ping traceroute lewat ISP-4
Berikut konfigurasi pada ISP-1, kita seting internet gateway terlebih dahulu,
- IP Address
- DNS
- DHCP Client
- FIrewall NAT
Kemudian, memastikan dengan mengetes PING 8.8.8.8, ISP-1 mendapatkan internet.
[admin@MikroTik] > system identity set name=ISP-1
[admin@ISP-1] > ip address add address=192.168.100.12/24 interface=ether2
[admin@ISP-1] > ip dns set servers=8.8.8.8
[admin@ISP-1] > ip firewall nat add chain=srcnat out-interface=ether1 action=masquerade
[admin@ISP-1] > ip dhcp-client pr
Flags: X - disabled, I - invalid, D - dynamic
 #   INTERFACE           USE ADD-DEFAULT-ROUTE STATUS        ADDRESS
 0   ether1              yes yes               bound         192.168.83.202/24
[admin@ISP-1] > ping 8.8.8.8
  SEQ HOST                                     SIZE TTL TIME  STATUS
    0 8.8.8.8                                                 timeout
    1 8.8.8.8                                                 timeout
    2 8.8.8.8                                    56 128 35ms
    3 8.8.8.8                                    56 128 29ms
    4 8.8.8.8                                    56 128 36ms
    5 8.8.8.8                                    56 128 31ms
    6 8.8.8.8                                    56 128 30ms
    sent=7 received=5 packet-loss=28% min-rtt=29ms avg-rtt=32ms max-rtt=36ms
Kemudian sama seperti sebelumnya pada ISP-2 juga kita akan men-setting internet terlebih dahulu,
- IP Address
- DNS
- DHCP Client
- Firewall NAT
Lalu, memastikan dengan mengetes PING 8.8.8.8, ISP-1 mendapatkan internet.
[admin@MikroTik] > system identity set name=ISP-2
[admin@ISP-2] > ip address add address=15.15.15.1/24 interface=ether2
[admin@ISP-2] > ip dhcp-client pr
Flags: X - disabled, I - invalid, D - dynamic
 #   INTERFACE           USE ADD-DEFAULT-ROUTE STATUS        ADDRESS
 0   ether1              yes yes               bound         192.168.83.204/24
[admin@ISP-2] > ip dns set servers=8.8.8.8
[admin@ISP-2] > ip firewall nat add chain=srcnat out-interface=ether1 action=masquerade
[admin@ISP-2] > ping 8.8.8.8
  SEQ HOST                                     SIZE TTL TIME  STATUS
    0 8.8.8.8                                    56 128 59ms
    1 8.8.8.8                                    56 128 23ms
    sent=2 received=2 packet-loss=0% min-rtt=23ms avg-rtt=41ms max-rtt=59ms
Pada konfigurasi pada ISP-3 juga sama kita setting,
- IP Address
- DNS
- DHCP Client
- Firewall NAT
[admin@MikroTik] > system identity set name=ISP-3
[admin@ISP-3] > ip address add address=16.16.16.1/24 interface=ether2
[admin@ISP-3] > ip dns set servers=8.8.8.8
[admin@ISP-3] > ip firewall nat add chain=srcnat out-interface=ether1 action=masquerade
[admin@ISP-3] > ip dhcp-client pr
Flags: X - disabled, I - invalid, D - dynamic
 #   INTERFACE           USE ADD-DEFAULT-ROUTE STATUS        ADDRESS
 0   ether1              yes yes               bound         192.168.83.201/24
[admin@ISP-3] > ping 8.8.8.8
  SEQ HOST                                     SIZE TTL TIME  STATUS
    0 8.8.8.8                                    56 128 83ms
    1 8.8.8.8                                    56 128 28ms
    sent=2 received=2 packet-loss=0% min-rtt=28ms avg-rtt=55ms max-rtt=83ms
Terakhir, pada ISP 4 masih sama kita harus menyeting,
- IP Address
- DNS
- DHCP Client
- Firewall NAT
[admin@MikroTik] > system identity set name=ISP-4
[admin@ISP-4] > ip address add address=17.17.17.1/24 interface=ether2
[admin@ISP-4] > ip dns set servers=8.8.8.8
[admin@ISP-4] > ip dns pr
                      servers: 8.8.8.8
              dynamic-servers: 192.168.83.2
               use-doh-server:
              verify-doh-cert: no
        allow-remote-requests: no
          max-udp-packet-size: 4096
         query-server-timeout: 2s
          query-total-timeout: 10s
       max-concurrent-queries: 100
  max-concurrent-tcp-sessions: 20
                   cache-size: 2048KiB
                cache-max-ttl: 1w
                   cache-used: 24KiB
[admin@ISP-4] > ip firewall nat add chain=srcnat out-interface=ether1 action=masquerade
[admin@ISP-4] > ping 8.8.8.8
  SEQ HOST                                     SIZE TTL TIME  STATUS
    0 8.8.8.8                                    56 128 27ms
    1 8.8.8.8                                    56 128 32ms
    2 8.8.8.8                                    56 128 25ms
    sent=3 received=3 packet-loss=0% min-rtt=25ms avg-rtt=28ms max-rtt=32ms
Router Gateway
Langkah selanjutnya kita akan mengonfigurasikan router gateway. sama seperti tahap sebelumnya pada router ini kita mengonfigurasikan IP Address, DNS, Firewall NAT. Namun pada router gateway ini kita membuat 4 NAT, 4 Gateway, dan ip route rule.
[admin@MikroTik] > system identity set name=R.GW
[admin@R.GW] > ip address add address=192.168.100.13/24 interface=ether4
[admin@R.GW] > ip address add address=192.168.1.1/24 interface=ether5
[admin@R.GW] > ip address add address=15.15.15.5/24 interface=ether3
[admin@R.GW] > ip address add address=192.168.2.1/24 interface=ether6
[admin@R.GW] > ip address add address=192.168.3.1/24 interface=ether7
[admin@R.GW] > ip address add address=16.16.16.6/24 interface=ether2
[admin@R.GW] > ip address add address=17.17.17.7/24 interface=ether1
[admin@R.GW] > ip address add address=192.168.4.1/24 interface=ether8
[admin@R.GW] > ip address add address=192.168.5.1/24 interface=ether9
[admin@R.GW] > ip add pr
#   ADDRESS            NETWORK         INTERFACE
 0   192.168.100.13/24  192.168.100.0   ether4
 1   192.168.1.1/24     192.168.1.0     ether5
 2   15.15.15.5/24      15.15.15.0      ether3
 3   192.168.2.1/24     192.168.2.0     ether6
 4   192.168.3.1/24     192.168.3.0     ether7
 5   16.16.16.6/24      16.16.16.0      ether2
 6   17.17.17.7/24      17.17.17.0      ether1
 7   192.168.4.1/24     192.168.4.0     ether8
 8   192.168.5.1/24     192.168.5.0     ether9
[admin@R.GW] > ip dns set servers=8.8.8.8
[admin@R.GW] > ip firewall nat add chain=srcnat out-interface=ether4 action=masquerade
[admin@R.GW] > ip firewall nat add chain=srcnat out-interface=ether3 action=masquerade
[admin@R.GW] > ip firewall nat add chain=srcnat out-interface=ether2 action=masquerade
[admin@R.GW] > ip firewall nat add chain=srcnat out-interface=ether1 action=masquerade
Setelah melakukan konfigurasi awal pada router gateway, langkah berikutnya adalah melakukan routing dengan menggunakan 'ip route rule'. Ini merupakan tahap penting dalam proses konfigurasi routing policy. 'ip route rule' adalah perangkat penting yang digunakan untuk mengarahkan atau merutekan lalu lintas data dalam jaringan kita. Dengan menggunakan 'ip route rule', kita dapat menentukan aturan tentang bagaimana paket data harus diarahkan melalui paket kita.
Nah, pada konfigurasi dibawah ini kita membuat src-address berasal dari pc client kita. action nya lookup dan memasukkan nama table sesuai dengan arah ISP yang mau dituju kemana.
[admin@R.GW] > ip route rule add src-address=192.168.1.0/24 action=lookup table=JALUR-ISP-1
[admin@R.GW] > ip route rule add src-address=192.168.4.0/24 action=lookup table=JALUR-ISP-2
[admin@R.GW] > ip route rule add src-address=192.168.2.0/24 action=lookup table=JALUR-ISP-1
[admin@R.GW] > ip route rule add src-address=192.168.3.0/24 action=lookup table=JALUR-ISP-2
[admin@R.GW] > ip route rule add src-address=192.168.5.0/24 action=lookup table=JALUR-ISP-3
[admin@R.GW] > ip route rule pr
Flags: X - disabled, I - inactive
 0   src-address=192.168.1.0/24 action=lookup table=JALUR-ISP-1

 1   src-address=192.168.4.0/24 action=lookup table=JALUR-ISP-2

 2   src-address=192.168.2.0/24 action=lookup table=JALUR-ISP-1

 3   src-address=192.168.3.0/24 action=lookup table=JALUR-ISP-2

 4   src-address=192.168.5.0/24 action=lookup table=JALUR-ISP-3
Selanjutnya, kita akan membuat ip route dengan gateway ISP 1-4 dan memasukkan routing mark sesuai yang sudah kita buat sebelumnya di table ‘ip route rule’.
[admin@R.GW] > ip route add gateway=192.168.100.12 routing-mark=JALUR-ISP-1
[admin@R.GW] > ip route add gateway=15.15.15.1 routing-mark=JALUR-ISP-2
[admin@R.GW] > ip route add gateway=16.16.16.1 routing-mark=JALUR-ISP-3
[admin@R.GW] > ip route add gateway=17.17.17.1 routing-mark=JALUR-UNTUK-PING
Jika kita memeriksa dengan detail pada 'ip route print detail', kita akan melihat bahwa jalur menuju ISP masing-masing akan menjadi AS. Mengapa bisa terjadi? karena setiap ISP memiliki jalur tersendiri yang berbeda. Maksudnya adalah masing-masing mereka memiliki jalur khusus yang ditentukan dan diatur oleh sistem mereka sendiri, yang memungkinkan mereka untuk mengoperasikan layanan mereka secara efisien dan efektif agar tidak ngelek.
[admin@R.GW] > ip route pr detail
Flags: X - disabled, A - active, D - dynamic,
C - connect, S - static, r - rip, b - bgp, o - ospf, m - mme,
B - blackhole, U - unreachable, P - prohibit
 0 A S  dst-address=0.0.0.0/0 gateway=192.168.100.12
        gateway-status=192.168.100.12 reachable via  ether4 distance=1
        scope=30 target-scope=10 routing-mark=JALUR-ISP-1

 1 A S  dst-address=0.0.0.0/0 gateway=15.15.15.1
        gateway-status=15.15.15.1 reachable via  ether3 distance=1 scope=30
        target-scope=10 routing-mark=JALUR-ISP-2

 2 A S  dst-address=0.0.0.0/0 gateway=16.16.16.1
        gateway-status=16.16.16.1 reachable via  ether2 distance=1 scope=30
        target-scope=10 routing-mark=JALUR-ISP-3

 3 A S  dst-address=0.0.0.0/0 gateway=17.17.17.1
        gateway-status=17.17.17.1 reachable via  ether1 distance=1 scope=30
        target-scope=10 routing-mark=JALUR-UNTUK-PING

 4 ADC  dst-address=15.15.15.0/24 pref-src=15.15.15.5 gateway=ether3
        gateway-status=ether3 reachable distance=0 scope=10

 5 ADC  dst-address=16.16.16.0/24 pref-src=16.16.16.6 gateway=ether2
Ketika kita pengecekan PING pada IP VPC masing-masing maka akan reply
[admin@R.GW] > ping 192.168.1.2
  SEQ HOST                                     SIZE TTL TIME  STATUS
    0 192.168.1.2                                56  64 4ms
    1 192.168.1.2                                56  64 2ms
    2 192.168.1.2                                56  64 2ms
    3 192.168.1.2                                56  64 2ms
    sent=4 received=4 packet-loss=0% min-rtt=2ms avg-rtt=2ms max-rtt=4ms

[admin@R.GW] > ping 192.168.2.2
  SEQ HOST                                     SIZE TTL TIME  STATUS
    0 192.168.2.2                                56  64 4ms
    1 192.168.2.2                                56  64 1ms
    2 192.168.2.2                                56  64 2ms
    sent=3 received=3 packet-loss=0% min-rtt=1ms avg-rtt=2ms max-rtt=4ms

[admin@R.GW] > ping 192.168.3.2
  SEQ HOST                                     SIZE TTL TIME  STATUS
    0 192.168.3.2                                56  64 10ms
    1 192.168.3.2                                56  64 3ms
    2 192.168.3.2                                56  64 3ms
    3 192.168.3.2                                56  64 2ms
    sent=4 received=4 packet-loss=0% min-rtt=2ms avg-rtt=4ms max-rtt=10ms

[admin@R.GW] > ping 192.168.4.2
  SEQ HOST                                     SIZE TTL TIME  STATUS
    0 192.168.4.2                                56  64 4ms
    1 192.168.4.2                                56  64 1ms
    2 192.168.4.2                                56  64 1ms
    3 192.168.4.2                                56  64 2ms
    sent=4 received=4 packet-loss=0% min-rtt=1ms avg-rtt=2ms max-rtt=4ms

[admin@R.GW] > ping 192.168.5.2
  SEQ HOST                                     SIZE TTL TIME  STATUS
    0 192.168.5.2                                56  64 4ms
    1 192.168.5.2                                56  64 1ms
    2 192.168.5.2                                56  64 2ms
    3 192.168.5.2                                56  64 5ms
    sent=4 received=4 packet-loss=0% min-rtt=1ms avg-rtt=3ms max-rtt=5ms

[admin@R.GW] > ping 8.8.8.8
  SEQ HOST                                     SIZE TTL TIME  STATUS
    0 8.8.8.8                                    56 127 42ms
    1 8.8.8.8                                    56 127 34ms
    2 8.8.8.8                                    56 127 30ms
    3 8.8.8.8                                    56 127 29ms
    4 8.8.8.8                                    56 127 30ms
    sent=5 received=5 packet-loss=0% min-rtt=29ms avg-rtt=33ms max-rtt=42ms
PENGUJIAN TRACE JALUR ISP 1,2,3 PADA VPC
Seperti yang sudah saya jelaskan sebelumnya bahwa paket akan diarahkan sesuai jalur isp masing-masing yang sudah ditentukan sebelumnya
| VPC6 dan VPC7 | ISP-1 |
|---|---|
| VPC8 dan VPC9 | ISP-2 |
| VPC10 | ISP-3 |
Berikut hasilnya apakah jalur nya sudah sama seperti yang sudah ditentukan?
- VPC6 - Memasukkan IP dan Gateway, DNS, Melakukan PING, serta Trace 8.8.8.8
VPCS> ip 192.168.1.2/24 192.168.1.1
Checking for duplicate address...
PC1 : 192.168.1.2 255.255.255.0 gateway 192.168.1.1

VPCS> ip dns 8.8.8.8

VPCS> ping 8.8.8.8

84 bytes from 8.8.8.8 icmp_seq=1 ttl=126 time=103.159 ms
84 bytes from 8.8.8.8 icmp_seq=2 ttl=126 time=50.733 ms
84 bytes from 8.8.8.8 icmp_seq=3 ttl=126 time=64.189 ms
84 bytes from 8.8.8.8 icmp_seq=4 ttl=126 time=57.223 ms
^C
VPCS> trace 8.8.8.8
trace to 8.8.8.8, 8 hops max, press Ctrl+C to stop
 1   192.168.1.1   19.523 ms  16.368 ms  10.820 ms
 2   192.168.100.12   173.035 ms  60.895 ms  109.055 ms
 3   192.168.83.2   93.904 ms  80.675 ms  55.084 ms
 4     *  *  *
^C 5     *
Berdasarkan konfig di atas bahwa pada VPC6 sudah berhasil melewati jalur pada ISP-1, yaitu 192.168.100.12
-
VPC7 - Memasukkan IP dan Gateway, DNS, Melakukan PING, serta Trace 8.8.8.8
VPCS> ip 192.168.2.2/24 192.168.2.1
Checking for duplicate address...
PC1 : 192.168.2.2 255.255.255.0 gateway 192.168.2.1

VPCS> ip dns 8.8.8.8

VPCS> ping 8.8.8.8

84 bytes from 8.8.8.8 icmp_seq=1 ttl=126 time=84.395 ms
84 bytes from 8.8.8.8 icmp_seq=2 ttl=126 time=57.851 ms
84 bytes from 8.8.8.8 icmp_seq=3 ttl=126 time=35.648 ms
84 bytes from 8.8.8.8 icmp_seq=4 ttl=126 time=28.715 ms
^C
VPCS> trace 8.8.8.8
trace to 8.8.8.8, 8 hops max, press Ctrl+C to stop
 1   192.168.2.1   2.465 ms  2.127 ms  2.161 ms
 2   192.168.100.12   5.915 ms  5.579 ms  11.416 ms
 3   192.168.83.2   6.615 ms  7.128 ms  5.865 ms
^C 4     *  *
Berdasarkan konfig di atas bahwa pada VPC7 sudah berhasil melewati jalur pada ISP-1, yaitu 192.168.100.12
- VPC8 - Memasukkan IP dan Gateway, DNS, Melakukan PING, serta Trace 8.8.8.8
VPCS> ip 192.168.3.2/24 192.168.3.1
Checking for duplicate address...
PC1 : 192.168.3.2 255.255.255.0 gateway 192.168.3.1

VPCS> ip dns 8.8.8.8

VPCS> ping 8.8.8.8

84 bytes from 8.8.8.8 icmp_seq=1 ttl=126 time=167.794 ms
84 bytes from 8.8.8.8 icmp_seq=2 ttl=126 time=110.506 ms
84 bytes from 8.8.8.8 icmp_seq=3 ttl=126 time=28.740 ms
84 bytes from 8.8.8.8 icmp_seq=4 ttl=126 time=99.204 ms
^C
VPCS> trace 8.8.8.8
trace to 8.8.8.8, 8 hops max, press Ctrl+C to stop
 1   192.168.3.1   1.432 ms  0.804 ms  1.176 ms
 2   15.15.15.1   3.091 ms  3.441 ms  2.970 ms
 3   192.168.83.2   4.581 ms  4.480 ms  3.937 ms
^C 4     *  *
Berdasarkan konfig di atas bahwa pada VPC8 sudah berhasil melewati jalur pada ISP-2, yaitu 15.15.15.1
- VPC9 - Memasukkan IP dan Gateway, DNS, Melakukan PING, serta Trace 8.8.8.8
VPCS> ip 192.168.4.2/24 192.168.4.1
Checking for duplicate address...
PC1 : 192.168.4.2 255.255.255.0 gateway 192.168.4.1

VPCS> ip dns 8.8.8.8

VPCS> ping 8.8.8.8

84 bytes from 8.8.8.8 icmp_seq=1 ttl=126 time=130.851 ms
84 bytes from 8.8.8.8 icmp_seq=2 ttl=126 time=137.055 ms
84 bytes from 8.8.8.8 icmp_seq=3 ttl=126 time=785.225 ms
84 bytes from 8.8.8.8 icmp_seq=4 ttl=126 time=111.491 ms
^C
VPCS> trace 8.8.8.8
trace to 8.8.8.8, 8 hops max, press Ctrl+C to stop
 1   192.168.4.1   22.660 ms  31.575 ms  16.411 ms
 2   15.15.15.1   53.851 ms  37.459 ms  54.076 ms
 3   192.168.83.2   62.072 ms  32.909 ms  27.486 ms
 4     *  *  *
^C 5     *
Berdasarkan konfig di atas bahwa pada VPC8 sudah berhasil melewati jalur pada ISP-2, yaitu 15.15.15.1
- VPC9 - Memasukkan IP dan Gateway, DNS, Melakukan PING, serta Trace 8.8.8.8
VPCS> ip 192.168.5.2/24 192.168.5.1
Checking for duplicate address...
PC1 : 192.168.5.2 255.255.255.0 gateway 192.168.5.1

VPCS> ip dns 8.8.8.8

VPCS> ping 8.8.8.8

84 bytes from 8.8.8.8 icmp_seq=1 ttl=126 time=259.197 ms
84 bytes from 8.8.8.8 icmp_seq=2 ttl=126 time=321.032 ms
84 bytes from 8.8.8.8 icmp_seq=3 ttl=126 time=103.005 ms
84 bytes from 8.8.8.8 icmp_seq=4 ttl=126 time=92.309 ms
84 bytes from 8.8.8.8 icmp_seq=5 ttl=126 time=159.547 ms

VPCS>
VPCS> trace 8.8.8.8
trace to 8.8.8.8, 8 hops max, press Ctrl+C to stop
 1   192.168.5.1   2.215 ms  1.184 ms  1.344 ms
 2   16.16.16.1   3.918 ms  7.391 ms  14.215 ms
 3   192.168.83.2   75.770 ms  38.113 ms  42.898 ms
^C 4     *
Berdasarkan konfig di atas bahwa pada VPC8 sudah berhasil melewati jalur pada ISP-2, yaitu 16.16.16.1
Firewall Mangle
Langkah selanjutnya dalam proses ini adalah untuk menuju ke menu firewall mangle. Di sini kita akan menangani jalur icmp, khususnya pada ISP-4. Ketika kita memilih untuk mengaktifkan mangle, ini akan memungkinkan semua paket icmp untuk melakukan ping dan traceroute melalui jalur ISP-4. Ini merupakan bagian penting dari proses yang memastikan bahwa semua paket icmp dapat bergerak dengan lancar dan efisien melalui ISP yang telah ditentukan.
- ‘IP’ lalu pilih ‘Firewall’
- Kemudian pada menu Firewall kita pergi ke menu Mangle
- Klik tanda (+)
- Pada tab general ‘chain’ pilih ‘prerouting’
- Protocol nya menggunakan protocol ping yaitu > icmp
- In. Interface kita pilih all ethernet, karena ada beberapa router dan client disini

- Action > mark routing
- New Routing Mark isikan dengan JALUR-UNTUK-PING

- Ketika kita ‘ok’ maka akan menampilkan seperti ini.

ROUTE RULE
Sama seperti konsep pada firewall, untuk dapat menge-PING
- Route Rule akan memprioritaskan di menu rules terlebih dahulu, jika router melihat paket di menu rule artinya router akan mengikuti instruksi yang ada di menu rule terlebih dahulu yang ada di main routing.
- Kalau misalkan router bisa tetap berkomunikasi arahkan table ke ‘main’
- Walaupun di menu main routing terdapat network selagi paket tersenut terdaftar telah ditandai tidak akan di proses di main routing dan tujuannya hanya untuk internet.
- Table ‘main’ harus diatas agar bisa kebaca.

PENGUJIAN TRACE JALUR ICMP
Setelah kita men-setting beberapa konfigurasi diatas, maka langkah terakhir pada study case ini kita akan menguji apakah semua paket icmp dapat melewati jalur ISP-4.
//VPC6
VPCS> trace 8.8.8.8
trace to 8.8.8.8, 8 hops max, press Ctrl+C to stop
 1   192.168.1.1   6.702 ms  2.208 ms  1.494 ms
 2   17.17.17.1   5.666 ms  5.307 ms  5.929 ms
 3   192.168.83.2   9.615 ms  4.843 ms  5.244 ms
^C 4     *  *

//VPC7
VPCS> trace 8.8.8.8
trace to 8.8.8.8, 8 hops max, press Ctrl+C to stop
 1   192.168.2.1   1.263 ms  1.240 ms  1.141 ms
 2   17.17.17.1   3.353 ms  3.573 ms  3.556 ms
 3   192.168.83.2   4.367 ms  4.846 ms  4.498 ms
 4     *  *  *
^C 5     *

//VPC8
VPCS> trace 8.8.8.8
trace to 8.8.8.8, 8 hops max, press Ctrl+C to stop
 1   192.168.3.1   1.027 ms  0.768 ms  0.992 ms
 2   17.17.17.1   2.870 ms  4.382 ms  2.621 ms
 3   192.168.83.2   3.777 ms  4.157 ms  4.446 ms
^C 4     *  *

//VPC9
VPCS> trace 8.8.8.8
trace to 8.8.8.8, 8 hops max, press Ctrl+C to stop
 1   192.168.4.1   1.351 ms  1.125 ms  1.178 ms
 2   17.17.17.1   4.125 ms  3.162 ms  2.772 ms
 3   192.168.83.2   4.939 ms  4.309 ms  4.328 ms
 4     *  *  *
^C 5     *

//VPC10
VPCS> trace 8.8.8.8
trace to 8.8.8.8, 8 hops max, press Ctrl+C to stop
 1   192.168.5.1   1.799 ms  0.964 ms  1.298 ms
 2   17.17.17.1   3.488 ms  2.924 ms  3.253 ms
 3   192.168.83.2   4.027 ms  3.994 ms  4.147 ms
^C 4     *
Jadi, kesimpulannya bahwa semua paket ICMP telah berhasil melewati jalur ISP-4, yaitu 17.17.17.1 sesuai dengan konfigurasi yang telah kita atur sebelumnya. Hal ini membuktikan bahwa konfigurasi yang kita lakukan telah berhasil dan sistem routing bekerja dengan baik.
Setelah melakukan berbagai pengujian, konfigurasi routing yang tepat sangat penting dalam memastikan kinerja optimal dari jaringan. Melalui penggunaan mark routing, kita dapat mengarahkan lalu lintas jaringan dengan lebih efisien dan efektif.
Penggunaan Firewall Mangle dan Route Rule juga sangat membantu dalam proses ini. Dengan menerapkan aturan dan penanda tertentu pada paket ICMP, kita dapat memastikan bahwa mereka melewati jalur yang benar.

Comments
Post a Comment